ProductionProcess note
Suno to FL Studio: Export Stems, Fix Timing & Start Mixing
Move a Suno idea into FL Studio: direct stem export, a free separation alternative, timing checks, mixer routing and a practical session checklist.
5 min readUpdated
Quick route: export separate audio parts from Suno, place them at a shared start in FL Studio, check their timing, then route each part to its own mixer insert. Use an external splitter only when you need it.
A useful session lets you change the vocal, drums and bass independently. The goal is to keep the musical idea while gaining control over the arrangement and mix.
1. Export directly from Suno
The current Studio 2.0 documentation describes this route:
- Open your song in Studio from its Library menu.
- Right-click an audio clip and choose Split Stems.
- Choose the separation you need. Listen to the results before exporting.
- Export the multitrack, or download individual WAV stems.
Studio is included in Premier. Access and extraction costs can change; check the current options in your account. A fixed claim that all users must use an external splitter is outdated.
Save the full mix as a reference alongside the stems. Keep one export version together in a clearly named folder so you do not accidentally mix parts from different generations.
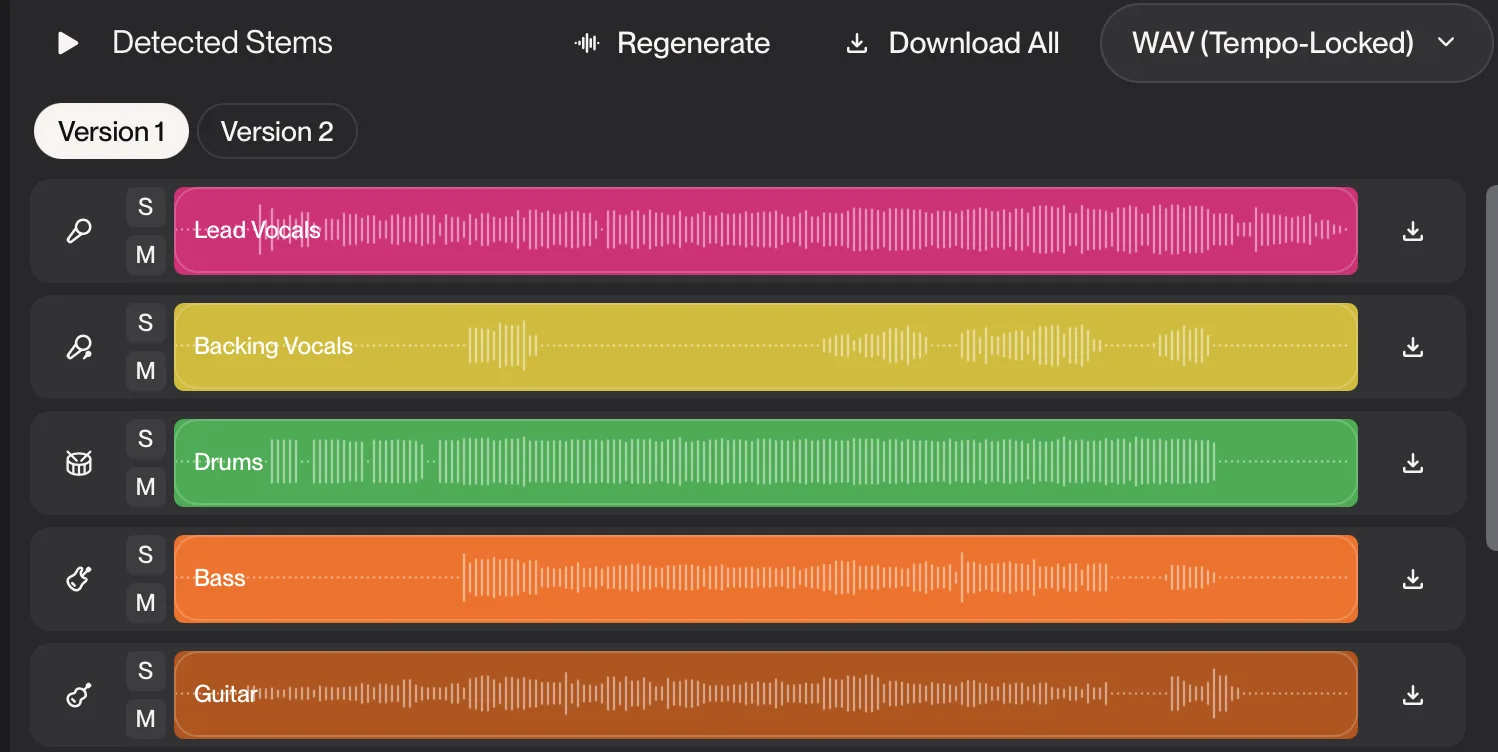
Screen recording: choosing an export format
Livvux archive recording: the earlier Suno stem export interface. Current Studio 2.0 controls differ; follow the steps above.
The recording shows the earlier interface's WAV and tempo-locked WAV choices. Use it to understand the export decision, not as a map of today's menus. Listen and check alignment even when an export claims to be tempo-locked.
2. Alternative: separate an existing audio file
If your available export lacks the parts you need, Ultimate Vocal Remover is a free local option. Download it from its official site, load the highest-quality audio file you have, and select a separation model for the parts you need.
Compare the result with the original at a similar loudness. Listen for softened drum attacks, vocal bleed and watery cymbals. Keep the cleaner version rather than repeatedly separating an already damaged stem. A two-part vocal/instrumental split can be sufficient when the only goal is to rearrange a vocal.
3. Import stems without losing their timing
Start with a blank FL Studio project. Keep the full mix muted on a separate reference track.
- Set the intended project tempo, then check it against the audio. A BPM label is a starting point, not proof that every beat is aligned.
- Drag the WAV files into the Playlist on separate tracks with the same starting position. Keep leading silence until you have checked alignment.
- Listen with the metronome near the start, middle and end. Compare kick transients with the grid.
- If the entire set drifts, correct tempo/stretching consistently across related stems. Do not move every stem's first audible note to bar one: different instruments can enter at different times.
- Save this clean import before adding effects.
The FL Studio Playlist manual explains Audio Clips and Audio Track mode. Playlist lanes are not automatically equivalent to mixer inserts in every workflow.
4. Route the mix so each part stays controllable
Give vocals, drums, bass and other instruments separate mixer inserts. Name them immediately. Check routing by soloing one part and watching the intended mixer meter.
Use Audio Track mode when you want a Playlist lane linked to a mixer insert. Otherwise assign the clip's channel to the intended insert explicitly. Keep a reference mix routed separately so it does not pass through the processing you are evaluating.
| Part | First check | Useful next decision |
|---|---|---|
| Vocal | Bleed, clipped phrases and intelligibility | Edit problem spots before adding effects |
| Drums | Softened transients and cymbal artifacts | Compare with a simple replacement rhythm |
| Bass | Timing, low-end overlap and mono compatibility | Balance against the kick before boosting lows |
| Chords / other | Masking and separation artifacts | Remove a competing layer before adding more |
An EQ shapes frequency balance; a compressor controls dynamics. Neither can fully restore information lost during separation. Avoid processing every track simply because a plugin is available.
5. Make a useful before-and-after comparison
Loop the same eight bars. First listen to the full-mix reference, then to your stem mix at a similar perceived loudness. Change one thing: vocal level, drum balance or a competing chord layer.
Ask whether the change makes the idea easier to hear. If the new version is only louder, turn it down and compare again. Save both versions with descriptive names so the decision is reversible.
For an editable session, keep the source WAV files with the project. Test reopening it before you archive the export folder.
Next: Get the free FL Studio session setup guide for a routing plan and a repeatable reference check. Then continue with mixing, mastering and export.
Troubleshooting
- Double or phasey sound: mute the original full mix when evaluating the separated parts together.
- Only one instrument is out of time: inspect that clip's start and stretching before changing the whole project.
- Every part drifts: check the source tempo over the whole song and the shared export range.
- A MIDI part sounds wrong: load an instrument, then correct the transcription against the audio. MIDI does not carry the original sound.
- A stem sounds damaged: compare another separation result or replace the part. More EQ is not always the answer.
Sources and update notes
Updated September 9, 2026 using Suno's Studio 2.0 guide, the FL Studio Playlist manual, and the official UVR project. The embedded recording is an earlier Livvux capture. The import and comparison checklist is a practical exercise, not a claim that the recording demonstrates a finished mix.
Put the stems to work
Build a session you can finish.
Use the free PDF setup guide for stem routing, bus groups and a level-matched reference check in FL Studio.
Get the FL Studio setup guide →Continue with mixing, mastering and export.
Questions / Answers
Frequently asked questions
Can Suno export stems directly?
Yes. Suno provides stem separation. In Studio 2.0, open an audio clip's context menu and choose Split Stems. Export the multitrack or individual WAV stems. Studio currently requires Premier; check Suno's current feature access before upgrading.
Do I need an external stem splitter?
Only if the export available to you does not give you the parts you need, or if you want to compare separation results. UVR is a free local alternative for an audio file you already have.
Why do my Suno stems drift in FL Studio?
Check the actual audio tempo, a shared export start, and each clip's stretching settings. If every stem drifts together, changing the project BPM label alone will not repair the audio. Keep related stems aligned while correcting timing.
Does MIDI replace a WAV stem?
No. MIDI describes notes; WAV contains sound. A transcribed MIDI part needs an instrument and may need note or rhythm corrections. Keep the audio reference for comparison.
Is the free FL Studio resource an FLP file?
It is a PDF session setup guide with routing and reference-check instructions. It does not include an FLP project or a preset pack.
Want more Livvux songs, breakdowns, and producer diary notes?
Follow my YouTube channel for the music and the process
Stay Close to the Sound
Get new Livvux releases, track breakdowns, producer notes, and useful FL Studio or AI-assisted workflow ideas in your inbox.
About the author

Livvux
Lucas is the producer behind Livvux, creating emotional EDM and showing the process behind the sound. Expect FL Studio workflow, AI-assisted ideas, Avicii-inspired music thinking, and personal track breakdowns.
Continue reading
Related posts

Free Livvux producer resources
Download the checklists, guides, and templates behind my emotional EDM workflow.